Thursday, September 30, 2010

One per Month - September

Well week one of the school holidays is almost over.  It has been jam packed so far with play dates at the park, best friends coming to our house for a play and today at Playgroup we had a visit from the Fire Brigade!!

Each month this year I have selected a different craft book from my bookshelf and made a project from the book. 
I have found this to be a sometimes challenging (as in getting around to making something within a set time frame) but always rewarding task. 

I'm sure we all love pouring over and being inspired by the gorgeous projects contained within the wonderful craft books we all accumulate.  But actually following through and producing a diverse range of beautiful, handmade items has been great!  And I have to say that I am really proud of myself for sticking with the challenge thus far. 


This month I chose a fantastic book called Sewing for Children by Emma Hardy.  I delibrately saved this book for a month which contained school holidays because as the title implies, this book contains 35 projects which are easy enough for children to tackle.  But not only are the projects quite simple they are also really lovely projects which adult crafters would enjoy making themselves.

The girls and I chose to make the Flower Hair Ties.  Miss A (aged 6) managed to make most of hers by herself with only a little help from me.  Miss B (aged 4) needed a little more help, but really enjoyed the process and has proudly been wearing hers every day and happily telling anyone who will listen that she made it herself!

I have half a dozen more cut out and ready to be stitched together - I can see these being great little christmas gifts for Miss A's school friends! 

I'm also itching to make afew of the hair barrettes too to go with the hair ties.  There are so many projects in this book that I can't wait to share with my girls and the beauty is there is a great range of simple projects and those that are a little more challenging for older kids.  So this book will give them and me years of pleasure.  

So eight months down, only three months to go!

I'm going away for a little family holiday tommorrow, but before I go I wanted to share something with you that I am so excited about!

Back in June last year I started on a couple of quilts for my girls.
I was greatly inspired by this quilt and rushed in without too much planning or thought. 
I floundered for quite a while, lost direction, changed direction and finally, after 15 months, came up with these.


More on these quilts to come next week!

Don't forget to check out and enter my giveaway while I'm gone.

For those of you lucky enough to have it, enjoy the long weekend and keep safe!

Wednesday, September 29, 2010

Spring-a-linging

Springtime. 


 My front garden

A very deep and meaningful conversation was had by Miss A, Miss B and I as we walked the path to school one morning last week. It went something like this.

Miss A, "I'm so glad that bad old Winter is over. I love Spring. What's your favourite season mum?"
"Ohhhhh" I said, "I love Summer. In all it's hot, sweaty, thirsty glory. I simply cannot abide Winter!"
Miss B, "I love Spring too, that's when all the flowers grow."

I hadn't realised just how much the cold, dark days of winter had been dampening my mood and dulling my enthusiasm for just about everything, until glorious Spring sprung and the creeping, seeping warmth of the sun touched my skin and made me feel H.A.P.P.Y!

A complete shift in my mood and motivation has taken over and I've been doing a bit of sewing for myself lately in preparation for the sunny days to come.

I sooooooooo love this skirt. I fell in love with it the moment I saw it on Dana's blog.  I knew I had to have at least one for this summer.


A couple of weekends ago it was so warm and lovely and summery that on a whim I pulled this oh so cheap (like $3 a metre cheap) cotton I had bought about a year ago from a local fabric shop, down from my stash and pulled together this skirt in no time at all.

It is so comfy and I adore it.

I really love the teal colour of the fabric too. It is only by complete and utter coincidence that it matches my hat perfectly.

The fabric is quite sheer and I didn't line the skirt so this one will be kept for wearing over tights.
I'll have to make another out of some heavier cotton for the height of summer.

But what really makes it - the pockets!  I've said it before and I'll say it again, I LOVE pockets.

This one is a re-fashion of a skirt I already had in my wardrobe.
 
I bought it years ago to wear to a funeral and although I really love the cut and fit of the skirt, every time I put it on I felt like I was going to a funeral. 
So I added a little embelishment using a doily I picked up ages ago at the Oppy and some lovely vintage bed sheets I had in my stash.

The birdy silhouette was inspired by the gorgeous apron I received from Julie in the Great Apron Swap 2010 awhile ago.


Only downside of this skirt - no pockets.

Hope you're loving the weather wherever you are right now!

100th-ish post giveaway and tutorial


Back in June I participated in a "Craft Room" swap organised by Cass

Regular readers may remember the upcycled wool scarflettes I made for my swap partners.
 

I was totally thrilled with how they turned out, but even better then that, I have really loved using and wearing the one I made for myself. 

I absolutely wore it to death over winter and got so many compliments every time I went out with it on!

I took photo's as I was making them, fully intending on posting a tutorial back in July.......................... but for some reason because I'm really slack, I didn't get around to it. 

And now that Spring has sprung here in sunny Sydney, posting a tutorial for a woollen scarf seemed such a ridiculous thing to do. 
Great timing if you're reading this from somewhere in the Northern Hemishpere though!

But I really, really wanted to share this with you guys and so I formulated a cunning plan.

Last Saturday I whipped up a springtime version - this time making  it reversible. 


I used some linen and some woven cotton off-cuts I had in my stash to keep within the recycled theme of this project and also in keeping with my current "use what you've got" kick. 

I have to say I love it equally as much as the winter version! 

I'm one of those people who gets goose bumps on a summer's day if there is a gentle breeze blowing, so I can see that this scarflette will be on high rotation in my spring/summer wardrobe. 

So in celebration of warmer weather, cooler weather, 100 blog posts and life in general, I'm going to give away one Upcycled Scarflette, made by me! 
If you are the giveaway winner you get to choose whether you want a Winter or Spring version and I will make it for you.

The rules of the giveaway are:
blog about my giveaway and tutorial and once you've done that leave a comment on this post with a link to your blog to let me know you've done it.

For an extra entry in the giveaway become a follower of my blog and  leave a seperate comment saying you've become a follower.

I'm going away next weekend so I'll keep the giveaway open until Friday 8th October and I will announce the winner over the following weekend.

Good luck! 

If you're not the lucky giveaway winner, or if you're really keen and just can't wait to get yourself an Upcycled Scarflette, you can go right ahead and make yourself one with the following tutorial.

Upcycled Scarflette

What you will need:


  • 1 woollen jumper in good condition

  • 1 polar fleece jumper in good condition

  • buttons in contrasting/co-ordinating colours to your taste

  • all the usual sewing paraphernalia eg. pins, scissors, sewing machine etc.
Now, set yourself aside roughly half an hour - that's all the time this little beauty will take you to whip up!

Here we go.


1. Lay your jumper flat and using either a rotary cutter or scissors, cut the jumper through both layers straight across under the sleeves.  Discard the portion with the sleeves.

2. Make another cut through both thicknesses of jumper 7 inches below the first cut. 

 3. Now you have a tubular piece of woollen fabric.  Cut one of the seams off so you can open up the tube to make one long piece of fabric.  Cut this piece so you have a rectangle measuring 7" by 26".

4. Repeat these 3 steps with the polar fleece jumper.

 5. Lay your two pieces of fabric one on top of the other, right sides together and pin.

 6. Using a straight stitch, sew all around the edges, using a 1/4 inch seam allowance. 
Make sure you leave a few inches open at one end for turning.

7. Turn the scarflette right way out, pin opening closed and stitch around all four sides of the scarflette to give a nice finished edge and also to close the opening you left for turning.

8.  Now to decide which way your scarflette is going to wrap around your neck, look at where the seam in the woollen side is.  Wrap it around your neck in such a way so that this seam will be hidden by the top layer of the scarflette.  The button hole should be made in this top layer and that will become your top left corner.  Refer to photo above! 

9. Next up, choose a button which you will use for actually keeping your scarflette closed (as opposed to any number of other buttons just stitched on to decorate your snazzy new scarflette). 

Now, using your button hole foot, make a button hole in the top left hand corner about an inch in from each edge. 
As you can see in the picture, on my scarf I stitched the button hole parallel to the long edges. 

DON'T do this.  Stitch the button hole parallel to the short edge and your scarf will stay closed alot better. 
Mine is still absolutely wearable but it will sit alot nicer with the button hole the other way.
  
10. Wrap the scarflette around your neck and mark where your button needs to be stitched on.


11. Stitch on button/s as desired. 
With some of the scarflettes I made little crochet flowers which I then stitched into place using a co-ordinating self covered button.  Just make sure that if you do this, you make a big enough button hole to accomodate the flower.
I can't remember what pattern I used for the flowers but just click on over to Ravelry - there are hundreds of patterns to choose from. 

You're done.  Easy peasy!


Now.  If you want to make yourself an Upcycled Scarflette suitable for warmer weather, just substitute the wool and fleece for some lovely light weight woven cotton and/or linen!

If you make an Upcycled Scarflette and post about it, drop me a line.  I'd love to see your version of the Upcycled Scarflette! 

Wednesday, September 22, 2010

One per month challenge - August

Hello there!  Let's just pretend it hasn't been a whole month since my last blog post shall we?  Lest's just pretend for a moment, that it's still August. 
OK, you with me?  Good, so here goes.


The book I've chosen for the One per Month Challenge this month is Lucinda Guy's Crochet Designs for Kids.  I cannot rave about this book enough, I looooove loooooove loooooove this book. 
I'd like to make every project in this book. 
BUT this is just not going to happen, as I've already got umpteen different projects of the hooky, sewy, quilty kind on the go at the moment. 
To help me narrow it down to just one project I asked Miss A what she would like me to make her for her birthday this month. 
She chose the Dolores Dress - lovely! 

I've been thinking for a while about ordering some Bendigo Wool
I've read some lovely things about this yarn and the prices are very competitive plus they have a great range of colours available.


So about a week into August I ordered some lovely Luxury 4 ply baby wool from Bendigo.  After about a week and a half (part of the reason this project was never going to be finished in August) a package  containing 5 gorgeous skeins of the softest most squishy wool arrived on my doorstep.

As soon as the littlies were sound asleep that night I got hooking.


Now.  Fast forward a month to last night.
To say this project has been slow going would have to be the understatement of the century.
This is the first project I have made using 4 ply fingering/baby weight yarn and a 2.5mm hook.
S. L. O. W. I tell you. 
Not to mention that after happily crocheting along for the past month, last night I frogged a good 15 rows due to a stitch count revealing I lost a stitch somewhere...............................
Needless to say this project was not finished in the month of August, and wont be finished anytime soon.
Patience my dear friends, patience.

If it wasn't for the fact this project was a birthday request by Miss A
and if it wasn't for the fact I had all the wool sitting waiting to be used
and if it wasn't for the fact I really, really love this dress and can't wait to see it on Miss A
I'd be quite tempted to frog the lot and move on.

To break the tedium of sewing a gazillion rows of single crochet and double crochet I have been doing a spot of sewing from time to time.


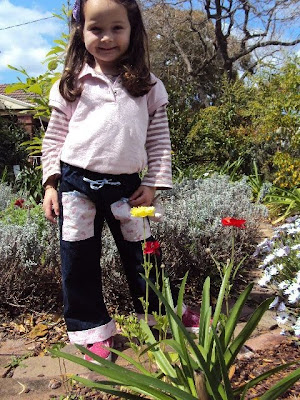
A couple of weeks back I finally whipped up a pair of these cute little pants for Miss B, using the 'Elasticated pants' pattern from one of my favourite craft books, Making Children's Clothes by Emma Hardy.

I've been on a real "use what's in your stash" kick of late so I used some nice dark denim, some cutesy candy print fabric (as chosen by Miss B) and some light blue bias binding I had stashed in my sewing room. 


Miss B has become a massive fan of purple over the last few months, dressing head to toe in purple at every opportunity. 
While purple is a lovely colour and tracksuit pants are great kids wear, sometimes it's nice to have them wearing something just that little bit nicer you know?

Quick, simple, easy to follow pattern.
What more could you want?

I've got another pair cut out and ready to sew up for Miss A sitting on the sewing table.

Come on school holidays, I say.  Only two days of school left this term. 
Not that I'm going to have too much time up my sleeve with all the galavanting we have planned.

Another little something I churned out a couple of days ago was the tiny happy shoulder bag.


I've had this on my list of "favourite free tutorials to try" (see over on the right side bar there) for ages now.

When I found out that one of the teacher's from Miss B's Occasional Care centre was leaving I knew this would be just perfect. 
Teresa has always admired the handmade items Miss B and I wear so I wanted to give her something handmade.

I used some Ikea fabric and pink pinwhale cord I had in my stash.  I really like how it turned out, momentarily considering keeping it for myself!

Does this happen to you when you make something to give away?

I think I consider keeping most things I make for gifts!


The only thing I did differently to the tutorial was to tie the straps together at the top instead of hand stitching them and this was predominantly because I had left it to the last minute - literally - and had to leave home to pick Miss B up from occasional care!
Looks cute like that though I think.

Although there have been a number of other stitchy, quilty, hooky projects being completed over the last few weeks which I would dearly love to share with you bath time is calling and this post is well and truly long enough already so they can wait until next time.

And no I haven't forgotten I promised a 100th post giveaway and tutorial, it's in the pipeline, I promise!