Showing posts with label sewing. Show all posts

Sunday, November 18, 2012

getting my mojo back

 
Although I have been sewing a few things here and there, I haven't tackled any major projects for what seems eons.
 
We've had quite a number of birthday parties of late so I have been making gifts to escape the headache of toy/gift shopping. 
Anyone else find that mind-numbingly boring?
 
This headband was for one of Aimee's friends, tutorial here.


Loveheart scatter cushion for another of Aimee's friends, inspired by this one here


and the BIG project, the beginnings of a mermaid quilt for another of Aimee's friends.
 
I've sewn every day this week and God it feels good!

Tuesday, June 26, 2012

Simply Sweet Tunic Top & Blouse pattern testing


Hello there, everyone!
Well I am so happy to say I am on the other side of my hip operation.
It went very well and I am happily resting and recovering, getting stronger every day.

A couple of weeks ago, I was contacted by the very talented Marina.

Marina wanted to know if I would test her new pattern,
which she was fine tuning to be released under her pattern label Wink Designs.

I didn't need to be asked twice! 

I decided to make this my last sewing project before my hip operation.


Whats great is that this pattern goes all the way from size 1, up to size 8. 
It can be hard to find patterns from smaller pattern houses in sizes larger than 6 so I made the long sleeve blouse for Aimee in the size 8. 


Remember the fabrics from this post, well this is the project they were bought for.


I really love this blouse and the pattern is very well written and easy to follow.
Of all patterns I've ever used, including both large commercially produced ones and smaller independant ones, this would have to be one of my favourites.  I followed the intructions pretty much word for word and didn't get stuck or confused anywhere.  And the garment came out looking and fitting just how it should - YEAH!!


I have another in size 6 for Betty cut out and just waiting to be sewn up when I'm well enough. 
Betty has requested no ties, so I'm going to replace them with a button and loop.


 Aimee loves the blouse too and it goes perfectly with her new pink skinny jeans :))))))))

 And I'm just waiting for Summer so I can make a few of the sleeveless version too!

Friday, April 27, 2012

kcwc update, a couple of cowl neck dresses and a bonnet

I've been doing really well on the sewing front this week,
not so well on the blogging front. 
There just don't seem to be enough hours in the day.............

I spent Day 1 (Monday) printing, cutting and taping patterns.
Day 2 and 3 , I made two Heidi and Finn Cowl Neck Jumper Dresses.

A dear friend has two little girls who both celebrated their birthdays this month and as soon as I saw this dress I knew I wanted to make one for each of them.

I bought the stretch fabric from my local fabric shop.


I really loved the stripey versions I had seen around blogland so that was what really guided my fabric purchases.

I think this is the first time I've made an actual garment from stretch fabric so my knowledge is next to zero about such things but I'm happy to report the dresses turned out fabulously.

I made them almost entirely on my overlocker, only using my sewing machine to hem the sleeves and the bottom of the skirt.

I made a size 2 and a size 4.  I really enjoyed making these super quick and easy dresses and will certainly be making more.


I made a little headband to go with the size 2 using some scraps and my hot glue gun.

I got Bethany to model the size 4, even though she has just turned 6 she fit into it. It's a little small and I would definately make her a size 5, but at least you get to see what it looks like on!


She was not happy to model it though :(

Day 4 (Thursday) I made a bonnet for Aimee using a pattern by Amy Karol.
I have used this pattern once before, funnily enough for one of the little girls who I made the Cowl Neck Jumper Dresses for.


Aimee is studying "the olden days" at school this term, and she will be going on an excursion in a few weeks time to a heritage listed house and the children are encouraged to dress in period costume.

This is once again a very quick and easy pattern to make.  I really enjoy making these bonnets, although I do think they are most suited to babies. 
Other then the excursion, I cannot see my kids wearing it out!

Today, like Jo from Bubala, I am giving myself the day off from sewing.
I spent today trapsing around Calmsley City Farm with 30 odd Kindergarteners (including my own) for a school excursion.

Suffice to say I am pooped! 

I'm still hoping to get a few more things made, or at least started, before the week is up.  Fingers crossed! 

How about you, how's your sewing for kcwc going?

Thursday, March 22, 2012

a bow neck blouse


I set to work the other day in an attempt to recreate a blouse based on this tutorial.

I've only got one photo due to a lack of enthusiasm on the photographers behalf!

 I wanted to keep the construction quick and simple so instead of making a buttoned opening I made a v-neck shirt which I pop on over my head.  I added a false placket with buttons (which are mostly hidden by the lovely bow) because I really liked that detail.  I finished the armholes with bias binding.  I had to fiddle a little to get the bow/collar to sit right, but it turned out ok in the end.

 I used this lovely blue and white stripe fabric I've had in my stash for a couple of years.  I have no idea what it is but it is light and has a beautiful drape and I don't think it would crease even if I screwed it up and slept on it!

I definitely wouldn't say it's the most professional garment I've ever sewn, but it was kinda fun figuring things out as I went along (the tute is a little light on detail) and I now have a very wearable, cute blouse for these unseasonably warm, muggy days we are having in Sydney.

Next up is a dress for Easter, which this year happily coincides with my wedding anniversary and a family lunch for my Mother in Law's birthday.

What's next on your sewing 'to do' list?

Tuesday, March 13, 2012

little miss B - an update

Afew of you have asked how Beth has settled in to school. 
Well I am happy (and a little surprised I have to admit) to say she has settled in beautifully and now gives school two big thumbs up!
 
After the first day, when she had to be dragged into the classroom crying, I gave her a little pep talk  bribed her (with the purchase of Angry Birds on the ipad no less) to go to school without crying. 
What do you know, the kid loooooves Angry Birds.............

Last week she was Star Student of the week in her class. 


 Congratulations Betty xo


Also, I finally got around to making Betty a smock. 

I made one for Aimee when she started Kindergarten and I used the same pattern for Beth's, taken from a great book, making children's clothes by Emma Hardy. 

I made a couple of changes though, I appliqued a 'B' (for Beth ofcourse) onto the front, I made an opening in the back to make it easier for her to get on and off on her own at school and I made the sleeves full length instead of 3/4 length to cover her uniform in winter. 
All I did to make the opening was finish the whole smock as per instructions, then cut from the hemline up to about 5cm from the neckline, I then overlocked the raw edge and turned it over about 5mm and sewed it down.

Another little sewing project crossed off my list :)

I took these pictures with Instagram, mainly because the battery in my camera had died.  I've been seeing Instagram photo's all over the internet and think they look great.  Mine, I'm not so sure.  Think it was a little too low light inside for the ipod. 
What do you think of Instagram?

Monday, March 5, 2012

Simplicity 2211

Hi there, how you doin' this fine sunny day? 
I don't know about you, but when the weather is fine and warm - especially after a string of rainy days - gee wizz it puts me in a good mood!!!
So, thanks to the sun coming out again, I've been able to take some happy snaps of my new favourite wardrobe item. 
My version of Simplicity 2211. 

This pattern is designed by Liesl Gibson from oliver+s, and produced and distributed by Simplicity under the lisette brand.
I've never bought an oliver+s pattern, but have only ever heard good things about them.
This here pattern is no acception.
Easy to follow, well written and accurate!
Remember this blouse I posted about back here.
Well this was my inspiration...........


and here is my version!

 I made afew alterations to the pattern I used to make it look like my inspiration blouse.
 
Here are the details...
I drafted a peter-pan collar using this fabulously detailed tutorial by one of my sewing heroes, Gertie.

I lengthened the sleeves by 3 inches and then attached the sleeve band from the inside first, so that it would make a little cuff on the outside of the blouse.

And I added a button closure to the back of the blouse, basically by cutting a
4 1/2 inch slit to the centre back.  I then made a length of binding from the same fabric to bind the edges with.  I self-covered a button and made a small loop, again both from the same fabric.

And the fabric you ask?
Wow I love this fabric. 
I actually bought it from Spotlight a while ago, with no particular project in mind.  I just loved it so much ♥
It's a japanese seersucker.  Sheer and light and beautiful. 
And surprisingly easy to work with.  Just made sure I used plenty of pins.
As soon as I saw my inspiration blouse I knew I'd be using this fabric to make my own version.

Well I have to say I'm pretty happy with my version, especially after wearing it all day yesterday.

If I was to pick fault with anything, there are three things I'd do a little differently next time.
I'd make the neckline smaller and I'd make the blouse a little longer. Oh and I'd probably interface the collar. 

Overall though I'm lovin' it and I got several compliments yesterday, so it must look ok!

Friday, February 3, 2012

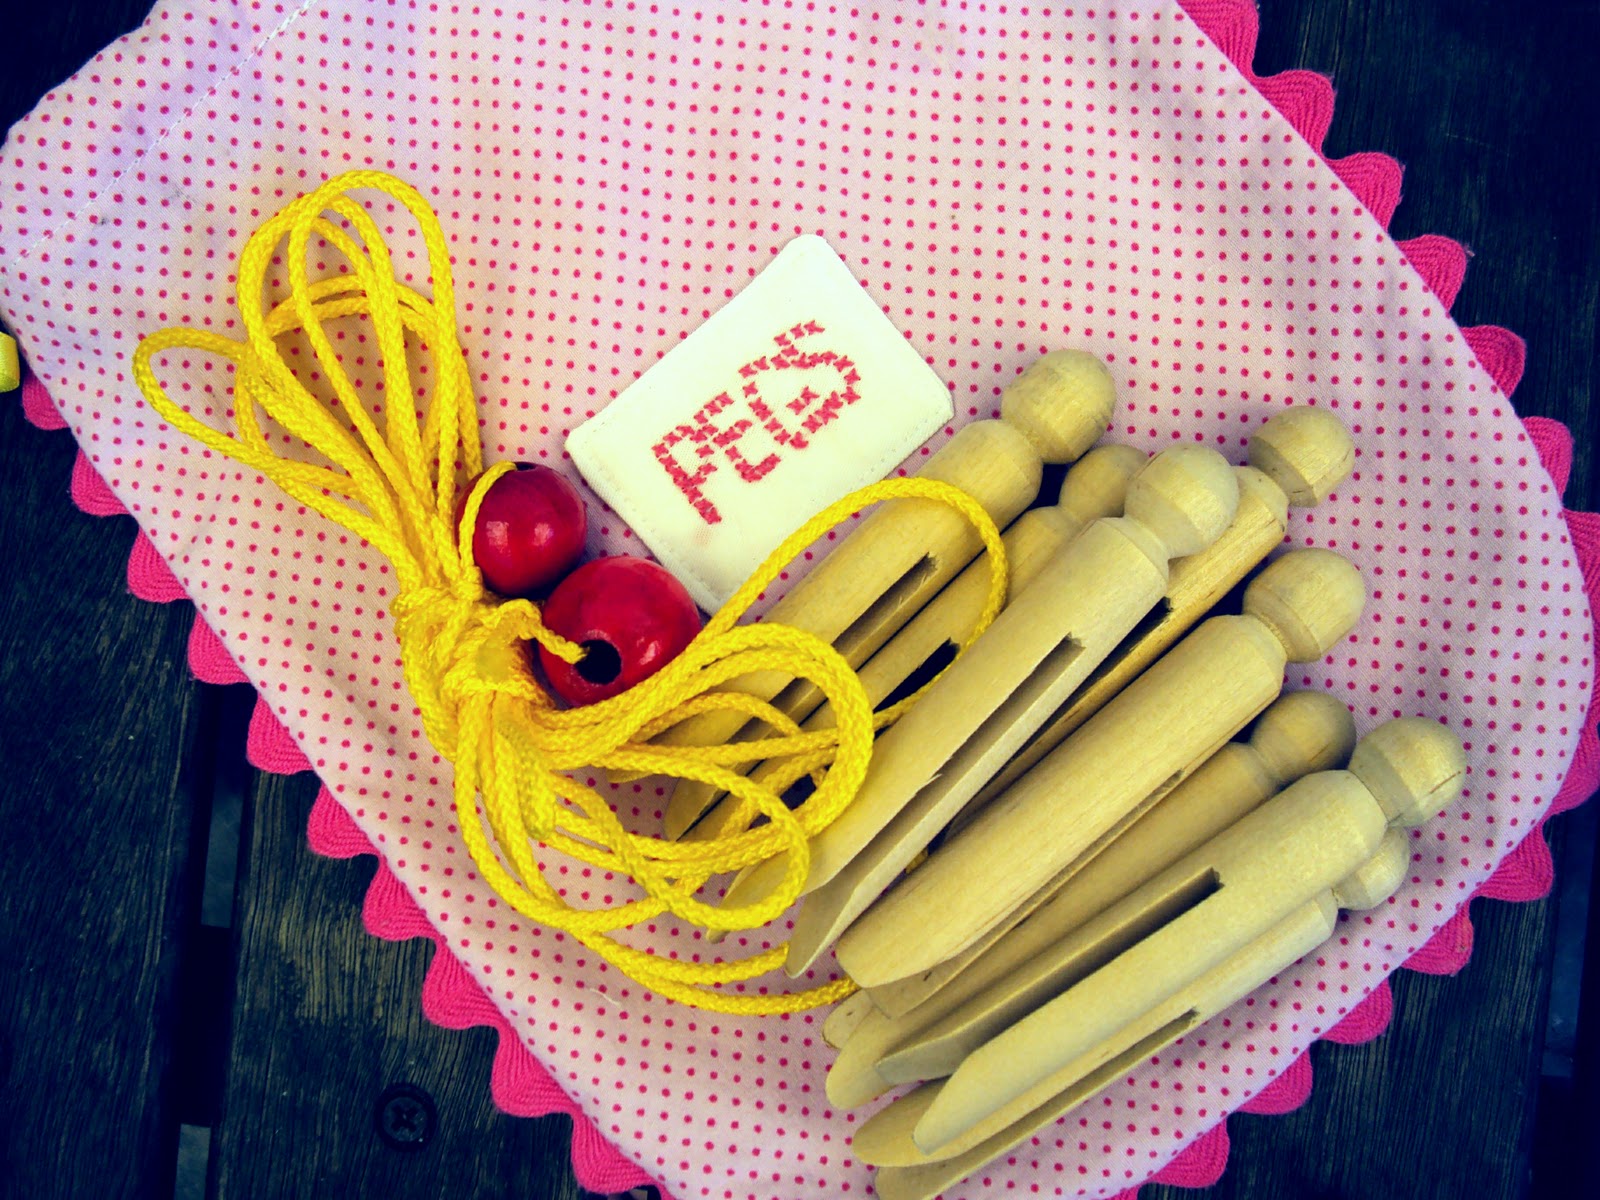
a simple handmade gift

A lovely little girl I know, let's call her Millie, turned four recently.  Now whenever Millie comes to my house she loves to play with my girls toy rotary clothes line.  She adores it in fact. 

So what could be better then her very own clothesline.  I got this very idea from somewhere out there in blogland but for the life of me cannot remember where it was........ so if you know, please let me know, so I can link back to it.  Ta.


Just a simple draw string bag,


with a little bit of (dodgy) embroidery so everyone knows its your PEG bag.
 

Pop in half a dozen old fashion wooden pegs and a length of nylon rope with some chunky wooden beads knotted onto each end. 

Voila, one simple, super cute handmade gift!

Besides Miss Millie loving clotheslines she desperately wanted an On-the-Go Art Satchel like her big brother and sister have,


so this one was whipped up especially for the occassion too.

Saturday, January 28, 2012

I do love a good jumpsuit


I've seen some really cute ones around this season.  I thought to myself it couldn't be that hard to make one.  I asked Aimee if she wanted one, "no thanks" came her response, quick as a flash.  I asked Betty if she wanted one, there was a moment of silence.  "You can choose the fabric" I said.  "OK then" she said. 

I do love the fabric she chose.  My sister gave it to me a couple of Christmases ago.  It was a three way present.  Fabric for me to sew (she knows how much I love to sew) some clothes for Aimee and Betty.  It feels like voile, soft as butter, mmmmmm, but I'm only guessing. 

Anyhow, so I wanted to make a jumpsuit. 
I could see in my minds-eye exactly how I wanted it to be.
So what I did is use a basic pants pattern for the bottom half and for the top I took some measurements of Beths torso.  I cut two rectangles using these measurements, trimmed abit off the top corners to allow for arm holes.  I made facings for the armholes, then turned down the top edge front and back to make a channel for some grosgrain ribbon I had in my stash. 


This makes the shoulder straps - abit like the pillow case dresses you see all over blogland. 

I then turned the top inside out and slipped it inside the pants so right sides were facing and sewed these two pieces together.  I then sewed another piece of matching grosgrain ribbon to the right side of the waistline over the seam, not only for decorative purposes but also to make a channel to run some elastic through to cinch in the waist. 


I added some elastic around the ankles of the pants too. 

If I were to make another one, I'd add a couple of inches to each side of the garment to give it a bit more of a billowy, casual look.  This one is quite fitted and although Beth has room to move and jump around with ease it won't fit her for long.

After I made this one, I decided to have a look around on the internet for a pattern or tutorial and come across afew beauties. 


What else is a jumpsuit good for if not jumping?!

Monday, January 9, 2012

Beach dresses and a Pinafore

Not the most imaginative title - infact not imaginative at all.  But I'm tired so it will have to do!

Today I thought I would post a couple of things I've actually made recently.  Both of these items were started, if not finished afew months ago.


First up are these smashing beach dresses.

I went to a local water park with a friend afew months ago and of course Beth's clothes got wet and i hadn't brought any spares for her.  My friend Lin lent me her daughters beach dress. 


Bethany l.o.v.e.d. it and begged me to make her one.

 
I found the stretch terry towelling at Spotlight, traced around the borrowed beach dress and sewed it all together.


  I used an old t-shirt to make the lining for the hood and added a couple of extra pockets at Beth's request. 

For Aimee's I did the same but added an inch or two all around to increase the size.  I messed up with the size of the neck hole and it came out too large, so I had to add an extra piece of fabric  back on to fix it. 
It turned out alright and is still perfectly wearable - its only for the beach or pool after all!

I'd actually forgotten about them, but the girls are having swimming lessons at the local pool this week and I found them in the beach bag and realised I'd never posted about them.

Yesterday I spent some time at the machine doing a spot of mending, making dog collars and leads for the girls toy dogs (as you do) and just generally moving bits and pieces from here to there. 


I came across this half made dress, drafted from a pattern in Toni Coward's book
Its the pinafore pictured on the front.

I borrowed the book from the library a while ago and decided this looked like a quick, easy project and it would make a nice, cool dress to wear in the heat of summer. 

It came together very quickly, with a little alteration to the shape of the skirt to stop it from looking too much like a tent.  Then I decided to add in-seam pockets and just eyeballed their placement.  Of course I inserted them too low down to be of any use what-so-ever. 

I got as far as unpicking them and then lost interest in the project and promptly moved on.


When I came across it yesterday I decided to get on with it and finish it. 
All I had to do was sew up the side seams and bind the neck edge, armholes and hemline. 
I wore the dress all day today (hence the crease lines) and I've decided I simply cannot do without pockets so I'm planning to add some to the front of the dress.

The fabric is a quilting cotton I bought from Spotlight a couple of years ago.  Not the best fabric for clothing, but the dress is such a simple style it works ok.  I used a plain grey ready made binding.

Over all - this dress is cool and comfortable. 
Not particularly flattering,
but do I really care about that on a stinking hot Sydney Summers day?
I think not!

Wednesday, January 4, 2012

a Custom Quilt

Late last year, a couple of weeks before the school year ended, a lovely lady who I work with in the tuckshop at Aimee's school (yes I am a tuckshop mum) asked me if I was willing to make a quilt for her to give to her son for Christmas. 

She explained it was to replace a quilt which her oldest daughter had been given as a baby eighteen years ago and it had been handed down to her son, who was still very attached to it.  Alas though, the quilt was now threadbare (I have since seen the quilt and that is being kind).  My friend wanted to replace the quilt with something her son could use on his bed, but that would also be a reminder of the original quilt.

As this lady is a very lovely lady, who I am rather fond of, I could hardly refuse.

So after some further discussion regarding size, fabric etc. this was her brief:
- a quilt of any size, but big enough to lay across the foot of her sons double size bed
- green on one side, navy on the other
- a ruffle around the edge
- a pocket to keep a piece of the original quilt in
- the word KIKI2 embroidered on it

I sent my friend off to Spotlight with some measurements and words of advice regarding fabric choice.  She came back to me later that day with a 2 metre length of green quilting fabric and a navy single bed doona cover.

This is what I came up with.  Please excuse the rather average photo's, I was madly snapping away as my friend was on her way over to collect the finished quilt!

front of quilt 
The finished quilt measures approx 60" x 75", so about a single bed sized quilt.
  

back
I used one side of the navy doona cover to make the back of the quilt

pocket and embroidery

and from the other side I cut a square of fabric from the buttoned edge to make the pocket. 
The pocket is a pure piece of genius if I do say so myself. 
I made it in such a way that I used the existing snap button from the doona cover and made the pocket the right size to fit perfectly within the quilted squares so it blends seamlessly into the back of the quilt.  If it weren't for the white button and the embroidery it would be quite secret!

Embroidery is not my strong point so I kept it simple here.

ruffle and binding
I cut the ruffle from the remaining fabric from that side of the doona cover.
The ruffle I'm quite proud of too. 
Having never made a quilt with a ruffle around the edge before, it took alot of searching the net to learn
a) how to make approx 10metres of ruffle
and b) how to attached it to the quilt
This tutorial from Everything Your Mama Made and More is revolutionary - who knew you could do this with an overlocker!

And this tutorial from Blackbird Designs for attaching a ruffle to your quilt is so simple and clear.
I used the green fabric to make the binding. 
I think it looks fantastic against the solid navy blue.  I actually think I like this side of the quilt best!

 I made double-fold binding rather than single-fold binding as in the tute for afew reasons.  
Firstly it is stronger but also because it cuts out that fiddley step of ironing in the edges of the binding and I think it makes for a neater finish!  I machine attached the binding as I do for all my quilts.  No hand stitching for me thanks! 


When she arrived to collect the quilt, my friend seemed pleased with the finished product, saying it was more then she hoped for.
Today she sent me a lovely text message thanking me for the quilt and telling me her son LOVED the quilt and had shed "tears of joy" upon receiving it for Christmas.

Can't get better then that!